What Does the Green and Red Light Mean on Raspberry Pi?

Understanding the different signals given off by technology can be confusing for both pros and beginners alike. Raspberry Pi, a miniature computer, is no exception to that frustration. Each Raspberry Pi features both red and green LED lights that flash at different frequencies as indicators. But what do the different frequencies mean?
Red and green lights are used to show different functions. A flashing green LED light indicates that a program is running; meanwhile, a flicker displays how the program is functioning. Red LED lights indicate whether or not the Raspberry Pi is receiving enough power.
So, how do you know what every flash means? This article will guide you through the process of understanding the green and red lights on the Pi and how to tell when something may be going wrong.
If you’re looking to quickly progress on Raspberry Pi, you can check out my e-book here. It’s a 30-day challenge where you learn one new thing every day until you become a Raspberry Pi expert. The first third of the book teaches you the basics, but the following chapters include projects you can try on your own.
Basic Green and Red Light Statuses
In this section, we will cover the basics of what the different colored LED lights indicate. Although these lights indicate more complex situations, it is important to know the basics first. We will discuss these more complex indications in the sections below.
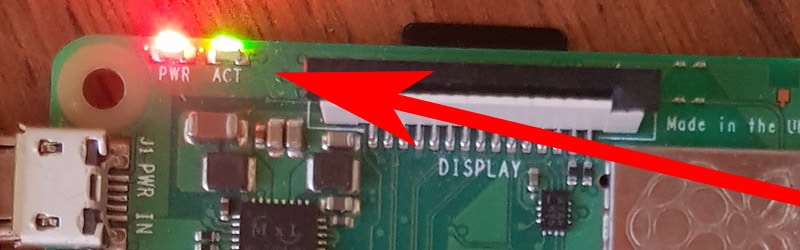
Recent Raspberry Pi models have only two LEDs: PWR and ACT. PWR is the red light while ACT is the green one.
For most of you, that the main information you need to know about light statuses:
The green light is attached to a component named “OK” or “ACT” and will light up to indicate the SD card status and program activity. A red LED only appears on the PWR component of the Pi. This indicates whether your Pi is receiving enough power from the device or not.
After inserting your SD card, pay attention to how the LED is activated. Once you understand how the LED lights activate, you can know if it is indicating card activity.
If you have an old Raspberry Pi model, other LEDs might be present on your device, here are the meaning of them:
- The LED light labeled FDX indicates a full-duplex connection, which means that the Pi and the computer are connected successfully.
- A green light on the LNK component means that there is LNK/Activity, which indicates Ethernet connection and data activity.
Check out the complete list of basic LED functions in the table below.
If you are lost in all these new words and abbreviations, request my free Raspberry Pi glossary here (PDF format)!
Download now
| Component label | LED color | Meaning |
|---|---|---|
| OK/ACT | Green | SD-Card Activity |
| PWR | Red | Power |
| FDX | Green | Full-Duplex connection |
| LNK | Green | LNK/Activity |
Now that you know the basics of what each LED light refers to, we can begin to look at the more complex issues they may be communicating.
Note: On the latest Raspberry Pi 5 model, the status LEDs have merged into a single two-color status LED. It’s basically red when connected to a power source and green when running.
Green Light and ACT
Based on which component you are reading on your Pi, the green light will have a different status. Besides the functions mentioned above for the LNK and FDX, the other green LED flashes will pertain to the ACT function.
The ACT component shows the Raspberry Pi activity. If the green LED on this component is flashing consistently, this indicates that applications are running on the system.

Join Our Community!
Connect, learn, and grow with other Raspberry Pi enthusiasts. Support RaspberryTips and enjoy an ad-free reading experience. Get exclusive monthly video tutorials and many other benefits.
Learn moreIf the green light remains consistently lit, this indicates that the SD card is still connected. If you insert an SD card and the green light does not appear, this indicates an issue with the setup. Make sure you followed these steps to install your Raspberry Pi OS system, if the light is off, there is probably an issue with your installation.
As you use your Raspberry Pi, you will notice that the green light may occasionally flash at different rates. The pattern that the light is flashing communicates to you the problem it is encountering. For example:
- If the green light on the ACT component flashes three times, this indicates a general failure to load.
- If the green ACT light flashes four times, this indicates that the code “start.elf” was not found.
Start.elf is a function found at the beginning of the boot folder.
If this function is not found, Raspberry Pi will not boot. - If your Raspberry Pi’s ACT light flashes green seven times, this means that any images you want to load will not.
- If the ACT light flashes eight times, this indicates that the SDRAM is not recognized and the program’s hard data will not be accessible
See the other reasons your green ACT light may be flashing in the table below!
| Light Pattern | Status |
|---|---|
| Constantly Lit | SD card connected |
| Flashing Consistently | Reading or Writing Code |
| Three Flashes | Generic failure to boot |
| Four Flashes | start*.elf not found |
| Seven Flashes | Kernal image (kernel.img) not found |
| Eight Flashes | SDRAM failure |
| Nine Flashes | Insufficient SDRAM |
| Ten Flashes | in HALT state |
Make sure you count all the flashes carefully to diagnose the problem. The light could flash up to 10 times, or even continuously.
These light statuses indicate a series of basic problems that are generally related to the Raspberry Pi’s operating code. Correcting problems indicated by the above patterns can be done with some simple coding.
Red Light and PWR

The red LED is always paired with the PWR function in a Raspberry Pi. This light indicates whether or not your Pi is plugged into a power source, but it does not show the actual charge of the Pi. Each model differs slightly in the way that it interacts with the LED lights, as stated above.
If the red light on your Raspberry Pi is blinking, this indicates that the power source it is connected to is not providing enough power (check this article to avoid this issue). This occurs when supplied voltage is below 4.63 Volts.
The Pi will not be able to turn on without the proper amount of power. You can solve your Raspberry Pi’s power supply problem by connecting it to the Official US C Power Supply by Raspberry Pi or by switching the outlet that it is plugged into. If you’re using a different charging system like an exterior battery, you may need to switch to an outlet or recharge the batteries first.
If you are lost in all these new words and abbreviations, request my free Raspberry Pi glossary here (PDF format)!
Download now
It is also important to be aware of the changes made to more recent Pi models. Recent models have been installed with what is known as a “brownout detector.” A brownout occurs when the AC power voltage decreases over time. This can be extremely harmful to the Raspberry Pi if not corrected quickly.
The brownout detector will cause the red LED light to turn off if the Raspberry Pi is not receiving enough power. The brownout detector will also cause the red LED light to turn off if a weak micro USB cable is used.
There are a few indicators that can show up when you’re looking at your PWR function. See the list of reasons your red PWR light is flashing in the table below.
| Red Light Status | Reason for Lighting |
|---|---|
| Consistent Blinking | Low power source |
| Light goes out | “brownout” detected |
| Consistently Lit | Adequate power received |
Interpreting the signals displayed by the red LED light is easier to do than interpreting those given by the green, simply because the red light only indicates the power status. However, both the red and the green light can signal complex problems.
It's a free PDF guide containing every Raspberry Pi Linux command you should know!
Download now
More Complex Problems
Now that we have covered the most basic meanings of the red and green lights, we can begin to look at the more complex problems the LED lights may be signaling. These more complex problems are often accompanied by more complex light patterns as well.
Although the previous problems were not indicated by flashes of different lengths, the problems that will be discussed in this section are signaled by a combination of both long and short flashes of light.
Let’s begin by looking at the complex problems signaled by the green LED light on your Raspberry Pi.
| Long Flashes | Short Flashes | Meaning |
|---|---|---|
| Two | One | Partition not FAT |
| Two | Two | Failed to read from partition |
| Two | Three | Extended partition not FAT |
| Two | Four | File signature/hash mismatch – Pi 4 |
| Three | One | SPI EEPROM error – Pi 4 |
| Three | Two | SPI EEPROM is write protected – Pi 4 |
| Three | Three | I2C error – Pi 4 |
| Four | Four | Unsupported board type |
| Four | Five | Fatal firmware error |
The first three signals listed above regard issues with the Raspberry Pi’s partitions. Partitions are essentially divisions in the hard drive that give the user more flexibility with the single hard drive.
If the partitions on your SD card are not in file allocation tables (FAT) then the Raspberry Pi will not be able to process the partitions, resulting in one of the first three signals. You can use Raspberry Pi Imager to create your SD cards to avoid this problem.
Other signals such as four long flashes and four fast flashes communicate that there is an unsupported board type. This indicates that there is a problem with the firmware that may need updating (I have a section about this in this other article).
Now that we have covered the issues indicated by the green LED light, we can move on to those issues signaled by the red LED light on your Raspberry Pi. Take a look at the complex problems signaled by the red LED light in the table below.
| Long Flashes | Short Flashes | Meaning |
|---|---|---|
| Four | Six | Power failure type A |
| Four | Seven | Power failure type B |
The list of problems indicated by the red LED light is much shorter than those indicated by the green LED light. However, this does not mean that red light signals will not be confusing.
As you see in the table, there are two different types of power failure signaled by the red LED light. These are type A and type B. But what are the difference between these two types of power failures.
The power failure type signal displayed on your Raspberry Pi will depend on the model of Pi you are using. For example, the Raspberry Pi Model A will show the power failure type A; meanwhile, the Raspberry Pi Model B will show the power failure type B.
Understanding the different types of power failures and the signals that lead up to them is essential for Raspberry Pi users. This is because Raspberry Pi is extremely sensitive to power failures and often fails to recover from the loss of power.
Power failure not only affects the Raspberry Pi, but it can end up corrupting the SD card. Some users suggest taking precautions to protect your SD card, such as running a power supply directly to the SD card. If the Raspberry Pi loses power, the SD card will still have power and the risk of file corruption can be avoided.
Using a good SD card model can also significantly decrease the risk of having such an issue (check my benchmark of the most popular SD cards here).
The more familiar you are with Raspberry Pi, the easier it will be to remember what the different LED light signals mean. Even though it only uses one green light and one red one, these limited functions can communicate quite a few different messages.
Something to keep in mind is that you have the ability to recode the specific light frequencies and functions. If you want three red LED flashes to signal loss of power, you can do so. However, this will require you to manipulate the formulas and frequencies for each indicator.
If you want to disable status LEDs completely, you can click on the link to follow the procedure on how to do it, it’s not complicated.
It's a free PDF guide containing every Raspberry Pi Linux command you should know!
Download now
Want to chat with other Raspberry Pi enthusiasts? Join the community, share your current projects and ask for help directly in the forums.
Hardware recommendations to address these issues
- Use the official power supply: The Raspberry Pi requires a specific power voltage. And if you don’t use the official power supply, you risk different types of issues that may affect your device or the SD card.
- Use the best SD card: Not all SD cards are created equal. After using various brands (including cheap ones), I can now confidently say that this is the best SD card to use with a Raspberry Pi. It’s not that expensive, be willing to pay a few more dollars for some peace of mind.
- Use a powered hub for USB devices: Most of my boot problems come from a power issue. If you already have a good power supply, you might need extra power, with a powered USB hub. It’s almost mandatory if you plug USB devices (like a USB drive or something like that).
With all of these, your Raspberry Pi will work better, and you can finally start to play with some interesting projects. Here are a few ideas for you:
- All The Best Raspberry Pi Project Ideas (with links)
- 15 Easy Projects for Raspberry Pi Beginners (With Links)
- Magic Mirror on Raspberry Pi: Complete Installation Guide
Whenever you’re ready, here are other ways I can help you:
The RaspberryTips Community: If you want to hang out with me and other Raspberry Pi fans, you can join the community. I share exclusive tutorials and behind-the-scenes content there. Premium members can also visit the website without ads.
Master your Raspberry Pi in 30 days: If you are looking for the best tips to become an expert on Raspberry Pi, this book is for you. Learn useful Linux skills and practice multiple projects with step-by-step guides.
The Raspberry Pi Bootcamp: Understand everything about the Raspberry Pi, stop searching for help all the time, and finally enjoy completing your projects.
Master Python on Raspberry Pi: Create, understand, and improve any Python script for your Raspberry Pi. Learn the essentials step-by-step without losing time understanding useless concepts.
You can also find all my recommendations for tools and hardware on this page.